INSTALLATION PROCESS
1. We recommend hardwood cladding to be coated all four sides with a quality oil based finish like Cutek CD50. We can pre-oil the first coat here at Everist Timber, saving you valuable time and money. The 2nd and 3rd coats should be done on site. Please refer to manufacturers specifications.
2. Check that walls are straight and plumb.
3. Make sure there is adequate drainage provisions in place to allow for any moisture inside cavity to escape.
4. Install a vapour permeable membrane.*
5. Install battens over the vapour permeable membrane no more than 450mm apart. Minimum gap between cladding and paper of 20mm is the preferred method of installation.*
6. Install flashings where necessary.*
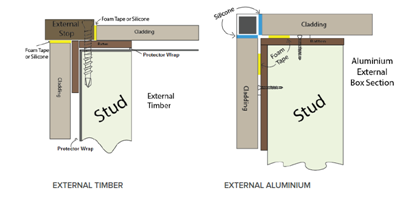
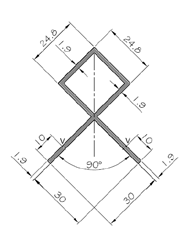
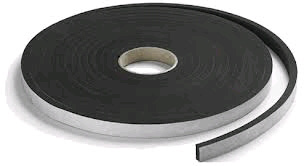
7. Install internal and external corners. Traditional timber corners or modern aluminium profiles can be used. Timber and aluminium corners must be sealed with an external silicone and a foam tape.*
8. Horizontal Starter Board – If running your cladding horizontally make sure the tongue side is facing up. Create a starter board by ripping off the tongue from the cladding and screwing to the bottom of your wall. This will allow for a concealed fix finish as per image below.
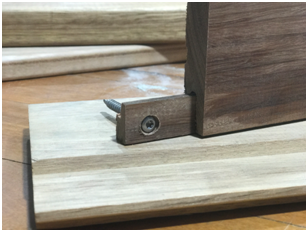
9. Vertical Starter Board – Rip off the tongue from the cladding and screw up to external stop making sure that the screw will be concealed by the next board as per image below.
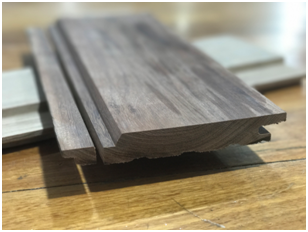
PHOTO 4
11. Mark out the board increments on the battens to ensure that the expansion gap is allowed for and to prevent progressive error and lines going out of alignment.
12. Start installing cladding from the starter board. Using a countersink drill bit, pre drill a hole for the screw to avoid the tongue splitting. This hole must be in the concealed fixing area to prevent the screw head from becoming visible with the natural movement of the cladding As per image 1.
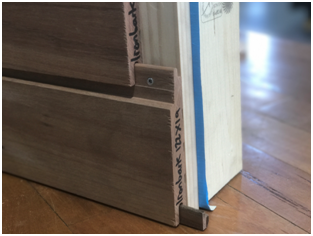
image 1.
Face fixing is another recommended fixing method, where two counter sunk self drilling screws are applied to the face of every board at each 450mm batten simular to fixing decking. Pre-drilling any end joins to prevent splitting.
See image 2.
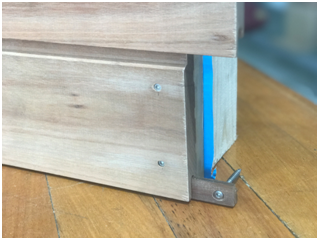
image 2.
13. Move up or across the wall making sure everything is level. Screw the tongue off at every batten until you reach the top or end of the wall. Making sure you have a watertight finish.
IMPORTANT NOTES
1. Make sure that any end grain or ripped edges are sealed with the same product used to protect the cladding.
2. All end matched joins need to be sealed with a high quality exterior sealant like Sika Pro or 11FC. If excess sealant is visible after installation wait until it is dry before cutting off with a chisel or knife making sure not to scratch the cladding.
* VAPOUR PERMEABLE MEMBRANE
Inclusion of vapour permeable membranes into the building structure allows water vapour to pass through the structure whilst preventing the entry of wind driven rain (liquid water) from the outside environment both during and after construction. When positioned against the outside of the building frame as a wall wrap, these membranes reduce the risk of condensation forming inside the home and building structure.
A vapour permeable membrane such as Watergate protective wrap range with a vapour permeability of no less than 2.0ug/N.s and a water barrier classification of HIGH must be installed to ensure the performance of your cladding system. Watergate protective wrap product must be installed as per manufacturers recommendations.
*CONTROLLING CONDENSATION
Position the vapour permeable membrane on the external side of the building frame, with the cladding spaced no less than 20mm from the membrane to allow a drying and drainage path for moisture, Watergate protective wrap membrane high water hold out allows condensate to safely drain away from the building without bleeding back through the membrane as condensate. These membranes provide superior permeability over perforated traditional ‘breather’ foils and meet the AS4200.1 Water Barrier “High” water holdout requirement for lightweight construction materials such as Australian hardwood timber claddings.
*FLASHINGS – AS PER NORMAL BUILDING
PRACTICES
Flashings at corners, doors, windows and wall intersections must be installed to prevent water from entering the cavity Hardwood cladding should finish no closer than 150mm from the ground, or a flashing should be installed to prevent any water take up from the ground.
*STUDS OR BATTENS
Fixing hardwood cladding to any wall or batten should have fixings at no more than 450mm centres. There must be a gap of 20mm behind the cladding to make sure any moisture can escape. All walls should be straight and plumb.
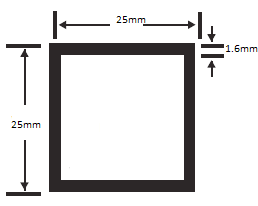
*CORNERS
Traditional timber 32x32 internal and 57x32 external stops can be used. Please see drawings for installation process. As a stylish alternative to traditional stops, there is an Aluminium range, available in natural anodised clear and anodised black, both of which are available fthrough Everist Timber.